is和==区别
Python中,万物皆对象。每个对象有3个属性:
id:对象的地址,可通过内置函数id()查看对象引用的地址。type:对象的类型,可通过内置函数type()查看对象的类型。value:对象的值。
a is b 实际上是比较id(a) == id(b)。
a == b就是比较对象a的值和对象b的值是否相等。
python的set()底层是什么数据结构
hash表
@property
@property装饰器来创建只读属性,@property会将方法转换为相同名称的只读属性,可与所定义的属性配合使用,防止属性被修改。
修饰方法,使方法可像属性一样访问
1
2
3
4
5
6
7
8
9
10
class DataSet(object):
  @property
  def method_with_property(self): ##含有@property
      return 15
  def method_without_property(self): ##不含@property
      return 15

l = DataSet()
print(l.method_with_property) # 加了@property后,可以用调用属性的形式来调用方法,后面不需要加()。
print(l.method_without_property())  #没有加@property , 必须使用正常的调用方法的形式,即在后面加()
两个都输出为15。
1
2
3
4
5
6
class DataSet(object):
  @property
  def method_with_property(self): ##含有@property
      return 15
l = DataSet()
print(l.method_with_property()) # 加了@property后,可以用调用属性的形式来调用方法,后面不需加(),否则会报错。
与所定义的属性配合使用,可防止属性被修改。
python定义属性时,无法设置私有属性,因此要通过@property的方法来进行设置。这样可隐藏属性名,用户使用时无法随意修改。
1
2
3
4
5
6
7
8
9
10
11
12
13
class DataSet(object):
    def __init__(self):
        self._images = 1
        self._labels = 2 #定义属性的名称
    @property
    def images(self): #方法加入@property后,这个方法相当于一个属性,这个属性可以让用户进行使用,而且用户有没办法随意修改。
        return self._images
    @property
    def labels(self):
        return self._labels
l = DataSet()
#用户进行属性调用的时候,直接调用images即可,而不用知道属性名_images,因此用户无法更改属性,从而保护了类的属性。
print(l.images) # 加了@property后,可以用调用属性的形式来调用方法,后面不需要加()。
限制属性的定义,仍旧以属性名为方法名,并在方法名上增加@属性.setter
1
2
3
4
5
6
7
8
9
10
11
12
13
14
15
16
17
18
19
20
21
22
23
24
25
26
class C:
    def __init__(self):
        self._score = 85

    @property                         # @property 装饰器本身就相当于 getter 方法
    def score(self):
        return self._score

    @score.setter                     # 给 score 属性装饰setter方法
    def score(self, value):           # 附加方法与原始的特征属性相同的名称
        if 0 <= value <= 100:
            self._score = value
        else:
            print(f"输入的值 {value} 超出范围 0~100 !")

    @score.deleter                    # 给 score_x 属性装饰 deleter 方法
    def score(self):                  # 附加方法与原始的特征属性相同的名称
        del self._score


c = C()
print(c.score)  # 85
c.score = 45
print(c.score)  # 45

c.score = 110   # 输入的值 110 超出范围 0~100 !
__setter__()方法
不管是实例还是类,都用__dict__来存储属性或者方法。
1
2
3
4
5
6
7
8
9
class Animal():
    def __init__(self, name, age):
        print(self.__dict__)
        self.name = name
        print(self.__dict__)
        self.age = age
        print(self.__dict__)

dog = Animal('snooby', 20)
输出:
1
2
3
{}
{'name': 'snooby'}
{'name': 'snooby', 'age': 20}
上述示例中,没有重载__setter__()方法,但是能看出在调用__init__()对属性赋值时,__dict__依次插入了key和value.
如果重载了__setter__()方法,但__setter__()没有显式往__dict__里插入key, value,那么__dict__中就是空的。如下例所示:
1
2
3
4
5
6
7
8
9
10
11
12
13
class Animal():
    def __init__(self, name, age):
        self.name = name
        self.age = age

    def __setattr__(self, k, v):
        print('-'*20)
        print('setting {} with {}'.format(k, v))
        print('current __dict__:{}'.format(self.__dict__))
        print('-'*20)

dog = Animal('snooby', 20)
print(dog.name)
输出
1
2
3
4
5
6
7
8
9
10
11
12
--------------------
setting name with snooby
current __dict__:{}
--------------------
--------------------
setting age with 20
current __dict__:{}
--------------------
Traceback (most recent call last):
  File "demo.py", line 14, in <module>
    print(dog.name)
AttributeError: 'Animal' object has no attribute 'name'
所以如果重载了__setter__()方法,__setter__()中需要显式往__dict__里插入key, value,并且只能通过self.__dict__[k]=value方式,不能用self.k = value,因为这样会触发调用__setter__(),然后就会无限递归下去。
1
2
3
4
5
6
7
8
9
10
11
12
13
14
class Animal():
    def __init__(self, name, age):
        self.name = name  # 会触发调用__setter__()
        self.age = age # 会触发调用__setter__()

    def __setattr__(self, k, v):
        print('-'*20)
        print('setting {} with {}'.format(k, v))
        self.__dict__[k] = v
        print('current __dict__:{}'.format(self.__dict__))
        print('-'*20)

dog = Animal('snooby', 20)
print(dog.name)
输出
1
2
3
4
5
6
7
8
9
--------------------
setting name with snooby
current __dict__:{'name': 'snooby'}
--------------------
--------------------
setting age with 20
current __dict__:{'name': 'snooby', 'age': 20}
--------------------
snooby
__all__属性
Python中的__all__属性,可用于模块导入时限制。
1
from module import *
上面的模块导入语句,在没有定义__all__属性的情况下,会导入module内的所有公共属性,方法和类。
如果定义了__all__属性,则只有__all__内指定的属性、方法和类会被导入。
注意事项
__all__只能是list类型的。__all__的内容不该动态生成,比如通过列表解析式。__all__的作用就是定义公开接口,若不以字面量的形式显式写出来,就失去了意义。- 即使有了
__all__,也不应该在正式代码中使用from module import *。
装饰器
装饰器本质上是个Python函数/类,它可让其他函数/类代码在无需修改的前提下增加额外功能,装饰器的返回值也是个函数/类对象。
装饰器经常用于有切面需求的场景,比如:插入日志、性能测试、事务处理、权限校验等场景,装饰器是解决这类问题的绝佳设计。
函数装饰器
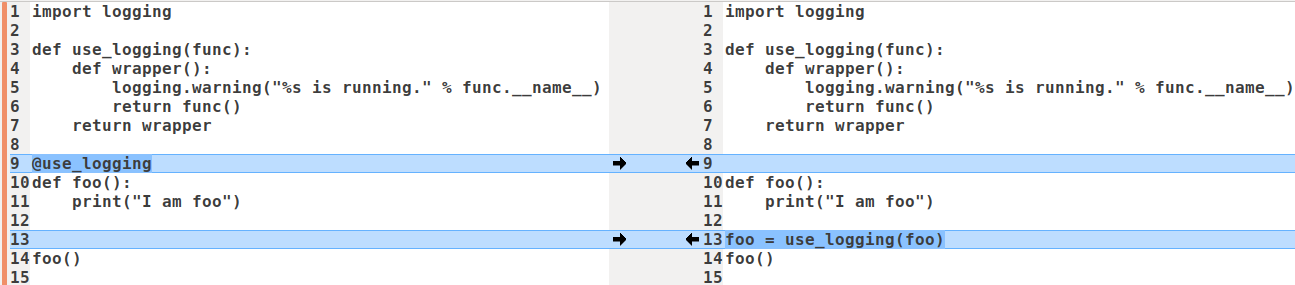
上面左右两边效果一样。
- 右边。
use_logging是一个装饰器,其实就是一个普通函数,它把执行真正业务逻辑的函数func包裹在其中,看起来像foo被use_logging装饰了一样,use_logging返回的也是个函数,这个函数名叫wrapper。在这个例子中,函数进入和退出,被称为一个横切面,这种编程方式被称为面向切面编程。 - 左边。通过增加第10行的
@use_logging,就可以省去右边第14行的foo = use_logging(foo)。左边直接调用被装饰后的foo即可得到想要的结果。如果有其他类似函数,可以继续使用该装饰器修饰,而不用修改函数或增加新的封装,提高了代码的可复用性和可读性。
类装饰器
使用类装饰器主要依靠类的__ca__方法,当使用@形式将装饰器附加到函数上时,就会调用此方法。
1
2
3
4
5
6
7
8
9
10
11
12
13
14
15
16
17
18
19
20
21
22
23
import logging

class Foo(object):
    def __init__(self, func):
        self.func = func

    def __call__(self):
        print('class decorator running.')
        self.func()
        print('class decorator ending.')

@Foo
def bar():
    print ('bar')

bar()

'''
输出:
class decorator running.
bar
class decorator ending.
'''
装饰器顺序
如果有多个装饰器,执行顺序是从里到外,最先调用最里层的装饰器,最后调用最外层的。
1
2
3
4
5
6
7
@a
@b
@c
def func():
    pass

# 等价于 func = a(b(c(func)))
pythonic
filter
filter()用于过滤序列,过滤掉不符合条件的元素,返回由符合条件的元素组成的新列表。
1
2
3
4
5
6
7
8
new_list = filter(lambda x: math.sqrt(x) % 1 == 0, range(1, 101))

# 将filter对象转为list
print(list(new_list))  # [1, 4, 9, 16, 25, 36, 49, 64, 81, 100]

# for 遍历
for num in new_list:
    print (num)
filter在Python3和Python2中有一点不同。Python2.x中返回的是过滤后的列表,Python3.x中返回的是filter类,filter类实现了__iter__和__next__,可以看成是一个迭代器,有惰性计算的特性,提升了性能,节省了内存。
尽量使用generator comprehension代替list comprehension
list comprehension
[expr for iter_var in iterable ] or [expr for iter_ in iterable if cond_expr]
1
2
3
4
5
6
7
>>> a=[12,3,4,6,7,13,21]
>>> newList =[x for x in a]
>>> newList
[12,3,4,6,7,13,21]
>>> newList2 =[x for x in a if x%2==0]
>>> newList2
[12,4,6]
generator comprehension
(expr for iter_var in iterable) or (expr for iter_var in interable if cond_expr)
1
2
3
>>> multiples_of_6 = (not (i % 6) for i in range(1, 10))
>>> list(multiples_of_6)
[False, False, False]
通过列表生成式,我们可以直接创建一个列表。但是,受到内存限制,列表容量肯定是有限的。而且,创建一个包含100万个元素的列表,不仅占用很大的存储空间,如果仅仅需要访问前面几个元素,那后面绝大多数元素占用的空间都浪费了。所以应当考虑使用生成器表达式而不是列表解析。
生成器表达式并不真正创建数字列表, 而是返回一个生成器generator,generator保存的是算法,每次调用next(g),就计算出g的下一个元素的值,直到计算到最后一个元素,没有更多的元素时,抛出StopIteration的错误。但是我们一般通过for循环来迭代它,并且不需要关心StopIteration的错误。
于这个生成器在每次计算出一个条目后,把这个条目“产生”(yield)出来。 生成器表达式使用了“惰性计算”(lazy evaluation,也有翻译为“延迟求值”,我以为这种按需调用call by need的方式翻译为惰性更好一些),只有在检索时才被赋值( evaluated),所以在列表比较长的情况下使用内存上更有效.A generator object in python is something like a lazy list. The elements are only evaluated as soon as you iterate over them.
三元运算符
也就是条件表达式,使用例子
1
2
is_fat
state = 'fat' if is_fat else 'not fat'
多线程
1
2
3
4
5
6
7
8
9
10
11
12
13
14
15
16
17
18
19
20
# form https://github.com/open-mmlab/mmdetection/mmdet/core/evaluation/mean_ap.py

from multiprocessing import Pool

def tpfp_default(det_bboxes,
                 gt_bboxes,
                 gt_bboxes_ignore=None,
                 iou_thr=0.5,
                 area_ranges=None,
                 use_legacy_coordinate=False):
    # bala bala
    return tp, fp

tpfp = pool.starmap(tpfp_default,
                    zip(cls_dets, cls_gts, cls_gts_ignore,
                        [iou_thr for _ in range(num_imgs)],
                        [area_ranges for _ in range(num_imgs)],
                        [use_legacy_coordinate for _ in range(num_imgs)]))

tp, fp = tuple(zip(*tpfp))
字节码转换
1
2
3
4
5
6
7
8
9
10
11
12
13
14
15
16
17
18
19
20
21
22
# STRUCT_FORMAT: NP_TYPE
{
    'f': np.float32,
    'e': np.float16,
    'd': np.float64,
    'b': np.int8,
    'h': np.int16,
    'i': np.int32,
    'q': np.int64,
    'B': np.uint8,
    'H': np.uint16,
    'I': np.uint32,
    'Q': np.uint64,
    '?': np.bool_,
}

int.from_bytes(b"\010\000\000", 'little')

import struct

struct.pack('f', 3.14)
struct.unpack('3f', 1.0, 2.0, 3.0)
覆盖率统计
1
2
3
4
5
pip install coverage

coverage run xxx.py  # 当前目录下会生成.coverage文件
coverage report -m
coverage html
解析4-bit数据
思路:numpy没有4-bit的内置数据类型,解析后的数据按照int8类型来存储,但是值跟4-bit对应的值是一致的。
每2个4-bit数据按照uint8来解析(用uint8是为了方便统一处理4-bit中最高位为1的情况),然后分别根据低4bit、高4bit的二进制信息计算出对应的值。
1
2
3
4
5
6
7
8
9
10
11
12
13
14
15
16
17
18
def parse_4bit_data(buffer):
    data = np.frombuffer(buffer, dtype=np.uint8)
    low = data & 0xF
    high = data >> 4
    low_ = low | 0xF0
    high_ = high | 0xF0

    condlist = [(low >> 3) == 0, (low >> 3) != 0]
    choicelist = [low, 0 - ((~low_) + 1)]
    low2 = np.select(condlist, choicelist)

    condlist = [(high >> 3) == 0, (high >> 3) != 0]
    choicelist = [high, 0 - ((~high_) + 1)]
    high2 = np.select(condlist, choicelist)

    out = np.column_stack((low2, high2)).reshape(-1)

    return out.astype(np.int8)
修改文件
1
2
3
4
5
6
7
8
def modify_bin_file(origin, modify, idx, val):
    with open(origin, 'rb') as fr:
        data = fr.read()
        # 使用bytearray而不是bytes, 是因为前者是mutable的,后者是immutable的
        data = bytearray(data)
        data[idx] = val
        with open(modify, 'wb') as fw:
            fw.write(data)